Now that you can connect your Raspberry Pi Zero to campus Wifi, what to do with it? How about a simple cloud-connected temperature and humidity sensor? For this project, I combined a Raspberry Pi Zero W with a DHT22 sensor. The DHT22 is a cheap, widely available sensor that can measure temperature with an accuracy of ~0.5 °C and humidity with an accuracy of ~5%. You can read about the DHT22 in wonderful detail here.
This post was inspired by several previous blog posts, including this one describing how to run the DHT22 with a Raspberry Pi and this one describing how to upload data from the sensor to Google Sheets.
Part list
| Part | Cost | Note |
|---|---|---|
| Raspberry Pi Zero W | $14.00 | With pre-soldered header |
| DHT22 | $6.00 | With breakout board |
| USB wall charger | $3.25 | Most wall chargers will work |
| USB cable | $3.00 | Almost any cable works |
| Micro SD card | $6.00 | 32GB is plenty |
| Case | $6.00 | Optional (I like these Pibow cases) |
| Total | $38.25 |
Note: The biggest downside to this project is that it’s always a little bit of a pain to get more than 1 Raspberry Pi Zero W. Even before the current supply chain collapse, Raspberry Pi Zero Ws were almost always limited to 1 per order from the major Raspberry Pi suppliers. The best method I’ve found is to order 2 every time I buy something from Adafruit, 1 with the bare board and 1 with a pre-soldered header. And make sure to buy a header to solder on the bare board. These ones are color-coded. I’ve listed the Raspberry Pi Zero W price above as $14, this is for the with-header model, but keep in mind shipping can almost double the price if you have to order a lot of them individually. Everything should also work with a Raspberry Pi Zero 2 W or any of the other Raspberry Pi computers.
Connecting the sensor(s)
As with most sensors, the DHT22 can be connected to the Raspberry Pi through the GPIO (double row of pins along the top). This site has an excellent description of what each pin is for. While you can buy a DHT22 as just the sensor, it makes things a little easier to buy it pre-soldered to a breakout board. This avoids the need to wire in a resistor or do any soldering (if you’re using a Raspberry Pi with pre-soldered header and jumper wires such as those included with the DHT22 linked above). The DHT22 breakout board has three pins: power, data, and ground. These need to be connected to the corresponding pins on the GPIO. Power is typically connected to a 3.3v pin on the Raspberry Pi. A 5v pin can also be used, but requires a level shifter (see below). The DHT22 data pin can be connected to any of the GPIO pins (labeled GPIO n here). Likewise, the DHT ground can be connected to any of the Raspberry Pi ground pins. Here’s an example of the DHT22 with breakout board wired to a Raspberry Pi:
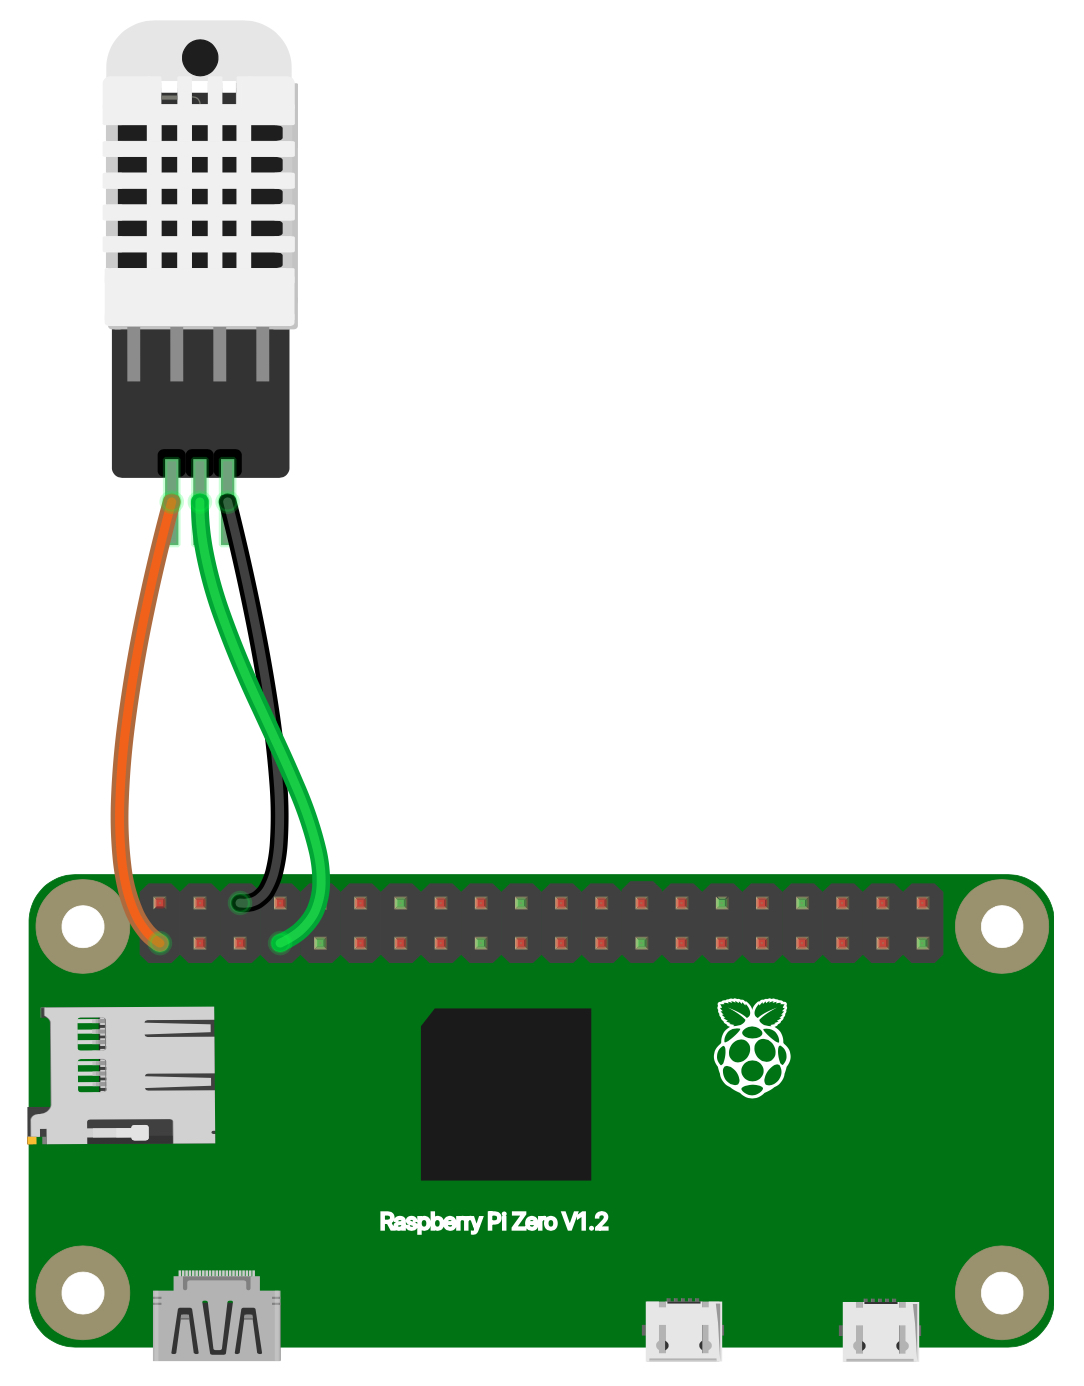
In this case, the DHT22 power is connected to the Raspberry Pi 3v3 power (orange), the DHT22 data is connected to GPIO 4 (green), and the DHT22 ground is connected to the Raspberry Pi ground (pin 6, black).
Gathering data and pushing to the cloud
After connecting the sensor to the Raspberry Pi, you should be able to begin reading data. First, install the required packages. I’ll be running it with Python 3 and the Adafruit_DHT library. While this library is depreciated, it seems to be more reliable on the Raspberry Pi Zero than the newer CircuitPython library, but the newer library is also an option. For uploading to Google Sheets I’ll use the gspread library.
Installation
sudo apt-get install python3-pip git
sudo pip3 install Adafruit_DHT gspread
Setting up a Google Service Account
Accessing the Google APIs for the first time takes a little work. Google uses a system called OAuth 2.0 to give you access to the APIs. In short, the system allows you to generate a key that gives you access to certain services, then you can use that key with your program. Follow the directions in the gspread documentation to create a Google Service Account and generate your key. It will be in json format, and should be copied to the ~/.config/gspread/service_account.json path on your Raspberry Pi. This file will give anyone who can read it access to your data, so best practice is to limit the scope of the key to only what you need. Also, make sure to not accidentally upload the key to a public Git repository.
The sensor reading script
The script to read the sensor data and upload it to the cloud is located here. Clone it into a directory called “git” in your users home directory:
mkdir ~/git
cd ~/git
git clone https://github.com/cedarwarman/Raspberry_Pi_DHT22_blog_post.git
I based the script on this blog post, but added Google Sheets uploads and a mechanism for reading multiple sensors at a set interval. The number of DHT22 sensors that can be run on the same Raspberry Pi is limited by the number of available GPIO pins. In this script, each sensor requires a URL file in the “url” directory of the cloned repository. This file identifies the name of the sensor, the GPIO pin for the Pi to read, and the URL of the Google sheet to upload the data to. The format is a series of tab-separated key/value pairs, for example:
id    1DGjbXkpqrkglqMmGkD95zWBSfHBzGcjPj48pBIQ8Isa
pin   4
name  example_sensor
Every two minutes the script reads each of the sensors with Adafruit_DHT, uploads the data to their respective Google sheets with gspread, and writes the data out to a local file.
Making it run automatically, headless
Usually I run this script on headless Raspberry Pi’s, so no monitor, keyboard, or mouse. Because of this, I like to set up the script to be totally automatic: plug it in and it runs. I use systemd to do this (after configuring the internet access). systemd is a powerful utility that manages many parts of Linux systems. We can run our own code with systemd using the systemctl utility. When we run our code in this way, it is referred to as a “service”. Services are configured using unit files, one of which I’ve included in the repository linked above. To run the sensor as a systemd service, we first copy the unit file into the appropriate systemd directory, then we enable the service:
sudo cp /home/pi/git/pi_sensor/service/pi_sensor.service /etc/systemd/system/
sudo systemctl enable pi_sensor.service
At this point we can immediately start the service with sudo systemctl start pi_sensor.service (systemctl will recognize the .service extension, so sudo systemctl start pi_sensor should also work). Because the service has been enabled, it will also automatically start on reboot. To check the status of the service, run sudo journalctl -u pi_sensor.service.
At this point, the sensor is complete! Try testing it on a local network first, which allows simple trouble shooting with ssh. To troubleshoot on a university network, I’ve had good luck with remote.it, but there are lots of good options for headless logins.
Longer wire runs
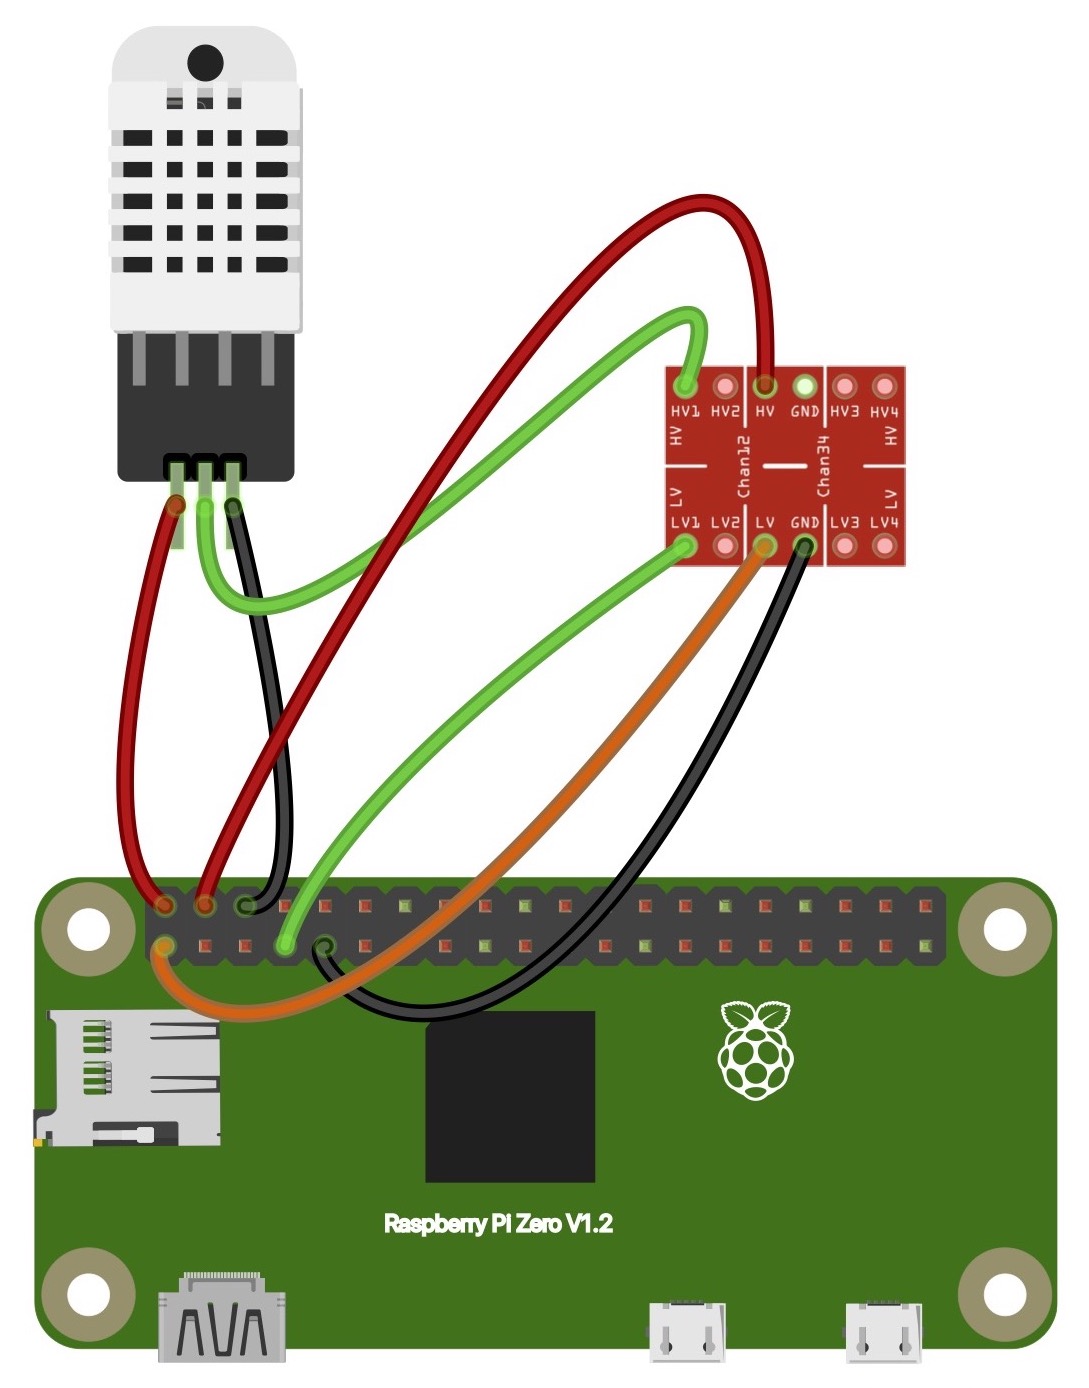
A limiting factor of the sensor as described above is the inability to have long wire runs between the Raspberry Pi and the sensor. More than a few feet of wire degrades the signal and can cause data loss. This is especially important when running multiple sensors in different locations with a single Raspberry Pi. Longer runs are possible, but require two considerations. First, use a high-quality shielded cable to reduce the signal loss. Ethernet cables are a good option for longer runs, particularly those with twisted wires and shielding. Second, run the DHT22 at 5v instead of 3.3v. The sensor can run at both voltages and the extra power improves reliability over long distances. The Raspberry Pi supplies both 3.3v and 5v through different pins on the GPIO. However, the data pins read signals at 3.3v. To avoid overloading the data pins, convert the 5v signal from the DHT22 to 3.3v using a level shifter. I used this one (KeeYees I2C logic level converter), but there are many options. As shown below, the DHT22 receives power from a 5v GPIO pin, then the data signal is converted from 5v to 3.3v using the HV1 and LV1 pins of the level shifter. The level shifter is also connected to 3.3v, 5v, and ground pins on the GPIO. In this case, the ethernet cable would be wired to DHT22 while the level shifter would remain close to the Raspberry Pi.
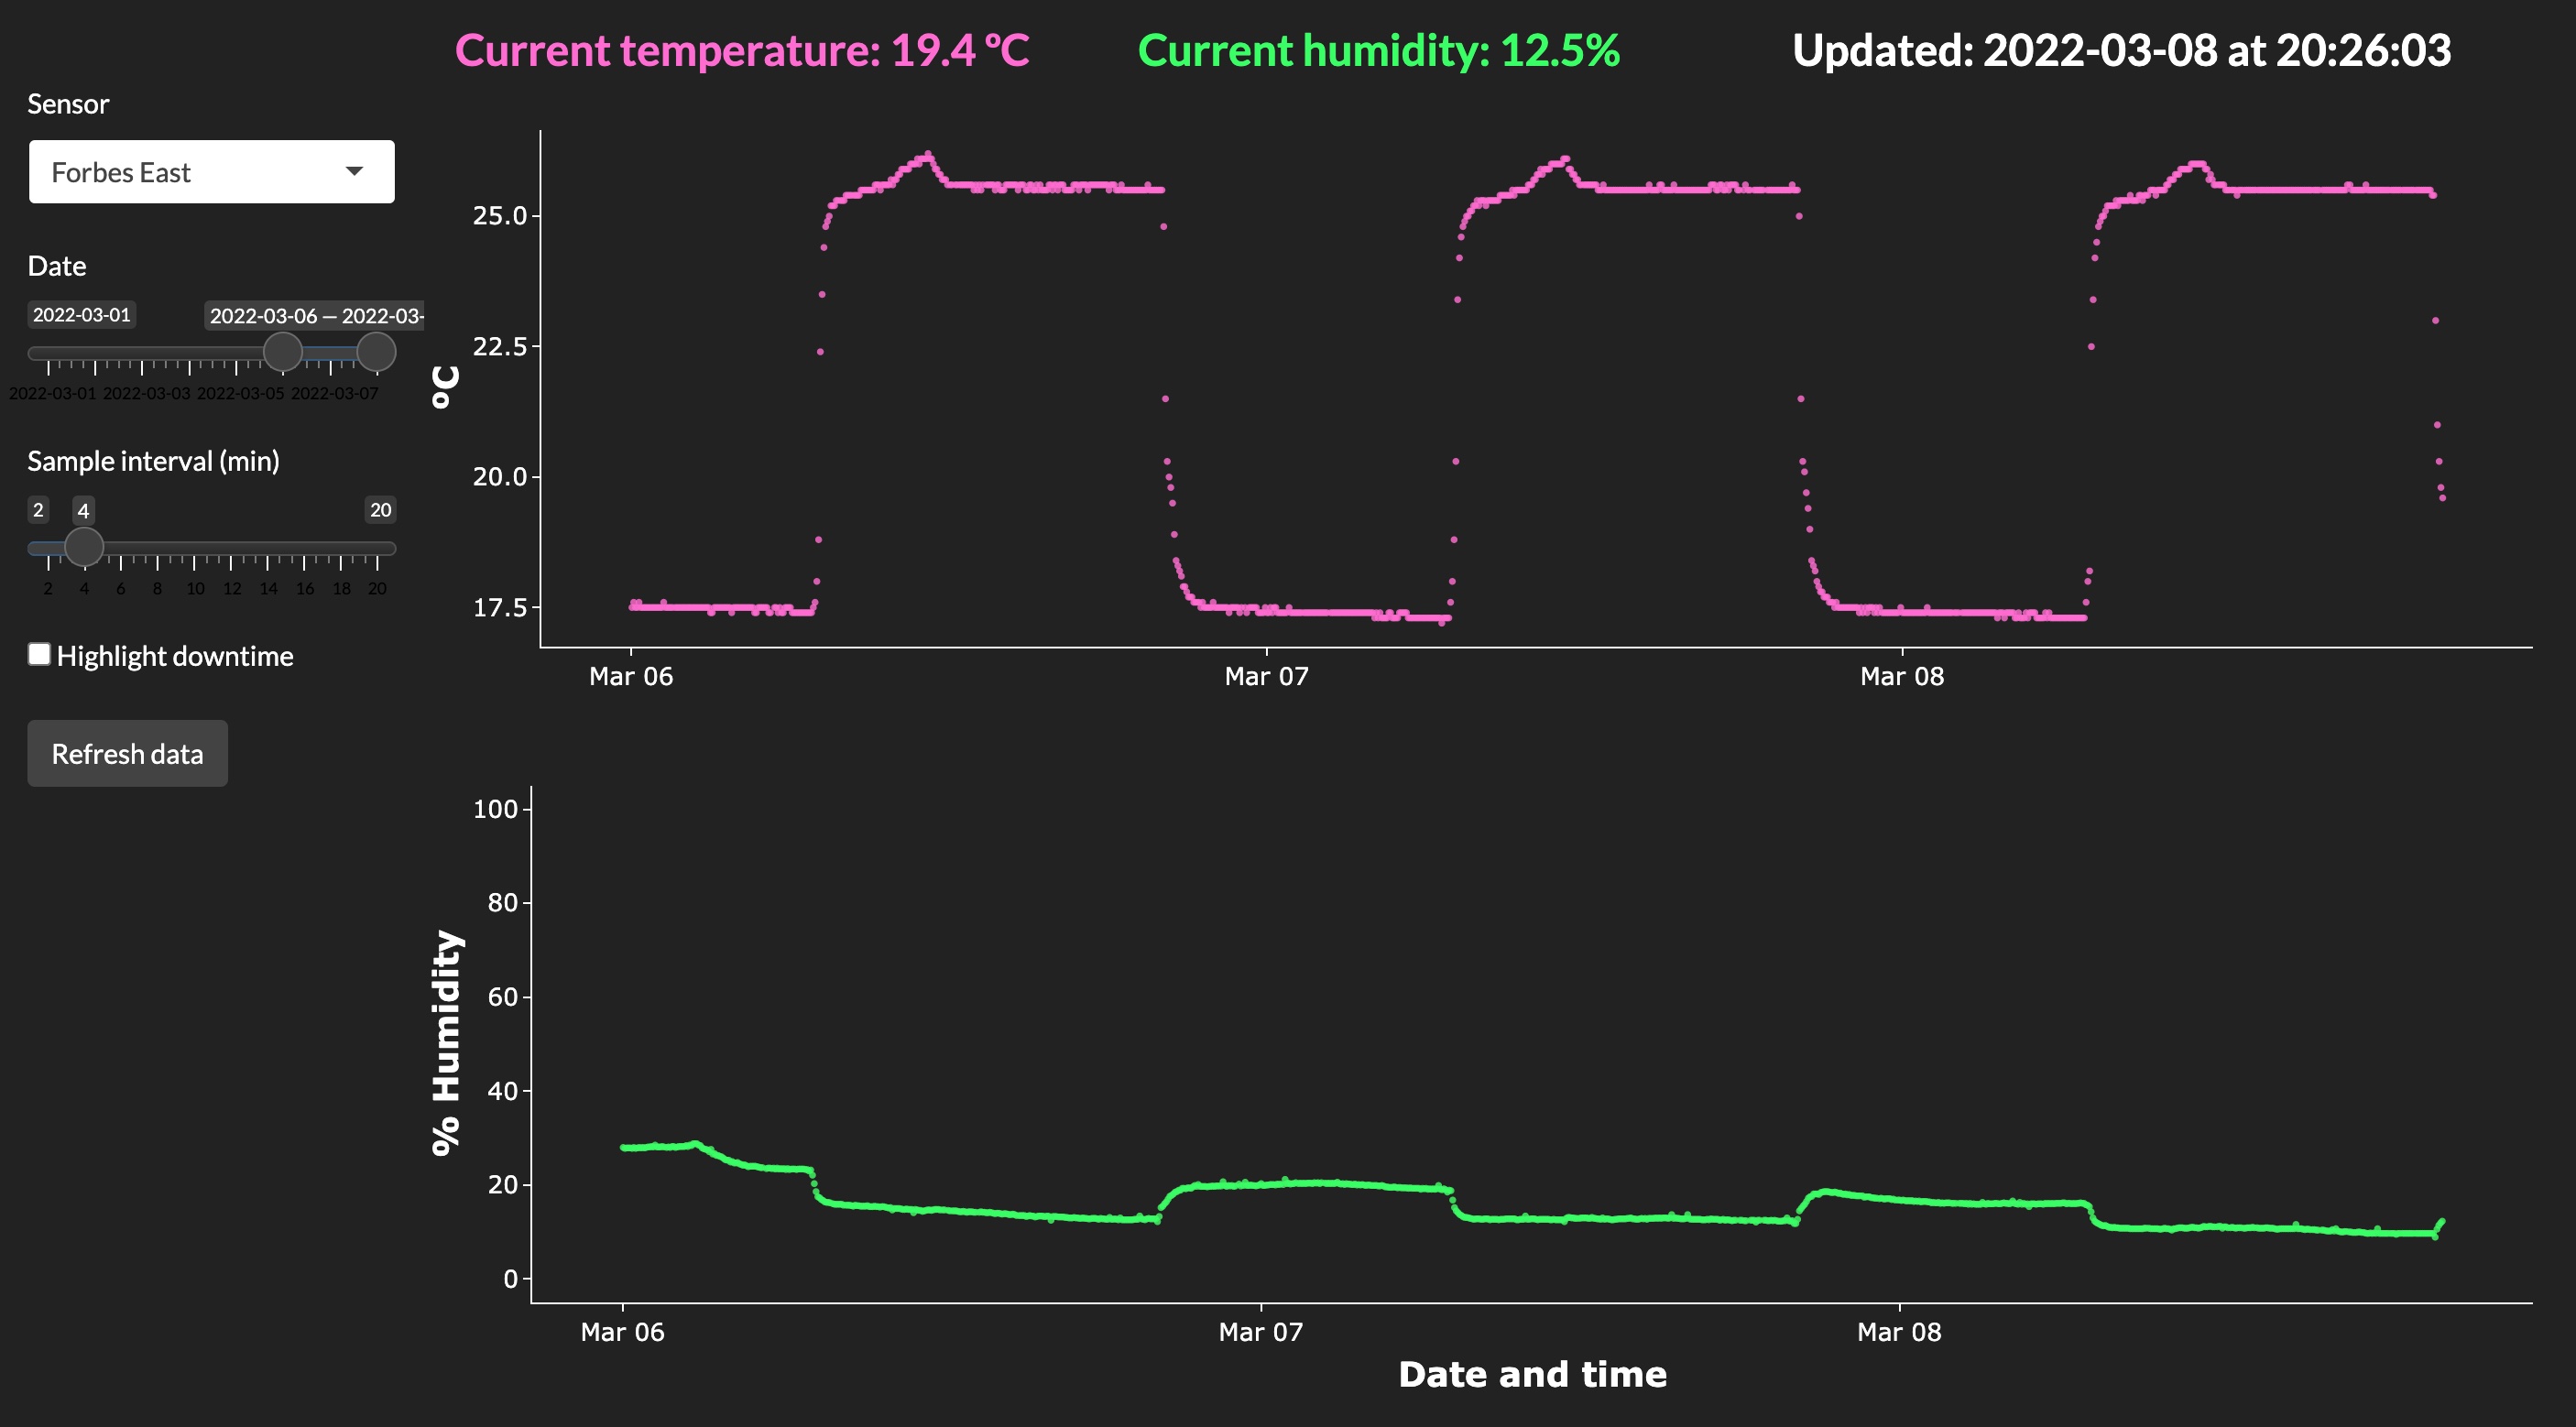
R Shiny interface
Now that there is sensor data being constantly uploaded to the cloud, what do you do with it? The simplest option is to download the data for plotting and visualization. However, this data can also be the perfect foundation for a simple R Shiny app. I built this app to visualize the data from sensors in our lab. The app pulls data from Google sheets for each sensor and visualizes temperature and humidity. Here’s the Github repository if you want to see more.
Conclusion
Hopefully this gives you a taste of what is possible with a few simple parts and some basic wiring. These building blocks should empower you to build a wide variety of sensors for your research projects. Have fun!